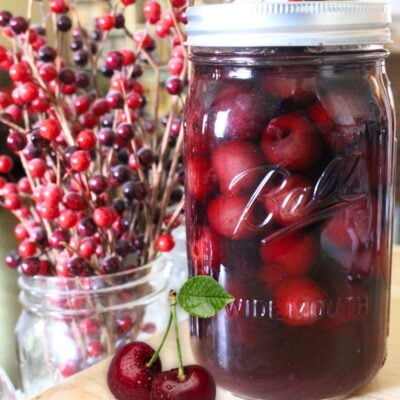
Whether you are growing your own cherries or buying them in bulk, canning cherries is a very easy water bath canning process! Adjust the syrup ratio in this recipe to your preference for the perfect home-canned cherries!

Canning Cherries (Easy Water Bath Canning Recipe)
While apple pie is my husband’s favorite fruit pie, cherry is at the top of the list for me! I like to use these home-canned cherries for a quick cherry pie, to top a cheesecake, or to just enjoy on their own!
For Valentine’s Day last year, we even turned our canned cherries into heart-shaped cherry hand pies, and they were so good!
Best Cherries for Canning
When it comes to canning cherries, the type you choose makes a big difference in both flavor and final texture. Here are some of the best cherries for canning, if you can get your hands on them!
- Bing Cherries – These dark, sweet cherries are a favorite for canning whole or in syrup. Their rich flavor and firm texture hold up well through the canning process.
- Rainier Cherries – Milder and golden in color with a blush of red, Rainiers make beautiful canned fruit, though they’re a little more delicate.
- Montmorency Cherries – These are the classic sour cherries used in pies and preserves. If you’re canning cherries for pie filling, jam, or sauce, this is your best bet!
Whatever variety you choose, make sure the cherries are firm, ripe (but not overripe), and free from bruises or blemishes. Softer cherries tend to break down during processing!

Instructions
This is an amazingly simple recipe. Honestly, the hardest part is pitting the cherries! Though that part is made so much easier with the help of this simple tool.
How to Make a Simple Syrup
The strength of sugar syrup you want for your cherries can be adjusted based on your taste preferences. I included the standard recommendation (medium syrup) in the recipe below, but you can scale it up or down to meet your needs!
- To make light syrup: Mix 2 1/4 cups of sugar with 9 cups of water and bring to a boil. Increase with a 1:2 ratio as needed.
- To make medium syrup: Mix 3 1/4 cups of sugar with 8 1/4 cups of water and bring to a boil. Increase with a 1:2 ratio as needed.
- To make heavy syrup: Mix 5 1/4 cups of sugar with 7 3/4 cups of water and bring to a boil. Increase with a 1:2 ratio as needed.

How to Water Bath Can Cherries
Once you have the cherries pitted, just make the simple syrup to your desired strength and process in a water bath for 25 minutes!
- Wash and prepare jars per Water Bath Canning Directions.
- Pit all cherries, set aside.
- Combine water and sugar in a medium pot and bring to a boil. Reduce the heat and maintain a low simmer.
- Pack the cherries into hot jars and ladle syrup over the cherries, leaving a 1-inch headspace.
- Use a canning knife to remove bubbles.
- Wipe off the rim with a hot towel, add rings and lids. Tighten to “finger tightness”, not too much.
- Place in a hot water bath, with the water level at least 2 inches above the jars.
- Bring to a boil. Start a 25-minute timer once the water is boiling.
- When the timer goes off, turn off the burner and leave the jars in the water for an additional 5 minutes.
- Remove jars with the jar removal tool, and place them on a towel.
- Do not move for at least 12 hours.
NOTE: Do not add any starch or thickening agents to the cherries before canning. This is not recommended for safe canning. Instead, you can thicken the juices after canning as detailed below!

How to Make Cherry Pie from Canned Cherries
It really only takes about 3 minutes to thicken the syrup when you go to use your canned cherries, so I like to err on the side of caution and “follow the rules” on this one!
- Make your favorite pie crust (2 crusts) and place one rolled crust in a deep dish pie pan. Then, grab 2 quarts of canned cherries. Drain the canned cherry juice into a saucepan and set the cherries aside.
- Add 1 TBSP all-purpose flour (we use einkorn flour) to the juice. Whisk over low heat until well combined.
- Raise the heat to medium and stir until the juices thicken.
- Add cherries to the bottom pie crust and pour thickened juice evenly over the cherries. Add the top crust to the pie and crimp the edges. Cut 1-3 vent slits in the top of the pie.
- Bake for 15 minutes at 425°F.
- Reduce the heat to 350°F and bake for an additional 40 minutes.
- Serve warm with Ice Cream, or chill.
Even More Fruit Canning Recipes
Canning Cherries
Equipment
- 1 Canning Tools set
- 1 deep pot or water bath canner
Ingredients
- 2 pounds sweet cherries
- 3 1/4 cup sugar
- 5 cups filtered or spring water
Instructions
- Wash and prepare jars per Water Bath Canning Directions.
- Pit all cherries, set aside.
- Combine water and sugar in a medium pot and bring to a boil. Reduce the heat and maintain a low simmer.
- Pack the cherries into hot jars and ladle syrup over the cherries, leaving a 1-inch headspace.
- Use a canning knife to remove bubbles.
- Wipe off the rim with a hot towel, add rings and lids. Tighten to “finger tightness”, not too much.
- Place in a hot water bath, with the water level at least 2 inches above the jars.
- Bring to a boil. Start a 25-minute timer once the water is boiling.
- When the timer goes off, turn off the burner and leave the jars in the water for an additional 5 minutes.
- Remove jars with the jar removal tool, and place them on a towel.
- Do not move for at least 12 hours.
How to Make Cherry Pie from Canned Cherries
- Make your favorite pie crust (2 crusts) and place one rolled crust in a deep dish pie pan. Then, grab 2 quarts of canned cherries. Drain the canned cherry juice into a saucepan and set the cherries aside.
- Add 1 TBSP all-purpose flour (we use einkorn flour) to the juice. Whisk over low heat until well combined.
- Raise the heat to medium and stir until the juices thicken.
- Add cherries to the bottom pie crust and pour thickened juice evenly over the cherries. Add the top crust to the pie and crimp the edges. Cut 1-3 vent slits in the top of the pie.
- Bake for 15 minutes at 425°F.
- Reduce the heat to 350°F and bake for an additional 40 minutes.
- Serve warm with Ice Cream, or chill.
Notes
Pin this for Later
Love this idea and I was in the middle of making the syrup when I had to take a short break and my hubby, trying to move things along, put all the cherries in before the syrup boiled. Now it’s not thickening . Can I use Tapioca as a thickener ? I really don’t want to lose all those cherries that made my fingers red, lol.
Hoping you can help,
Hi Dona! Unfortunately you can’t use tapioca to thicken the sauce and still can the cherries.
If you were using them right away it would be fine, but not for canning.
However, for home canned (unlike commercially available pie filling) cherries the sauce is not supposed to be thick during canning. You’re canning them in a syrup until use. At which point you can add flour, cornstarch, or tapioca to thicken right before use.
I hope that helps!
Hi, can you use the drained cherry juice with the water? I hate to lose all that goodness!
Hi Sheri! Since the cherries don’t get cooked before canning, there shouldn’t be any cherry juice lost at all!
You put the pitted cherries in the jar, raw, then cover with syrup. That way all the juice is in the jars!
Hope that helps!
Can you use frozen pitted cherries, previously thawed, instead of fresh cherries ? If this would make the filling too runny, would it be possible to thicken a bit with natural pectin?
Thanks for the amazing recipe!
Hi Claudia! Yes you can use frozen, I just did 50 pounds of frozen cherries with this recipe and they were soooo good!
No modifications are necessary since you thicken the sauce after canning (when making the pie). Enjoy!